The last newsletter was about corner radii. This time we are going to talk about thread depths.
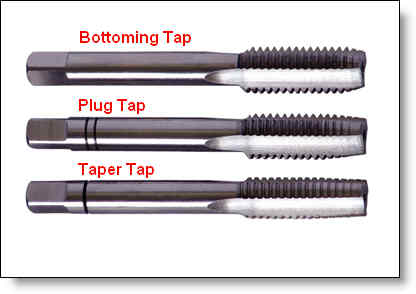
We have talked about the tolerances associated with thread depths and how challenging it is to achieve a very high tolerance on the depth of threaded holes. Partly it’s because it is very hard to determine exactly where the first full thread begins, because all taps have a lead in chamfer on their tip as you can see in figure A below. In addition, with the way tapping is performed in CNC machines with synchronizing the RPM and feed rate of the spindle, it is somewhat hard for the machine to tap quickly within a high tolerance.

Figure A: Taps with lead-in chamfers on the tips.
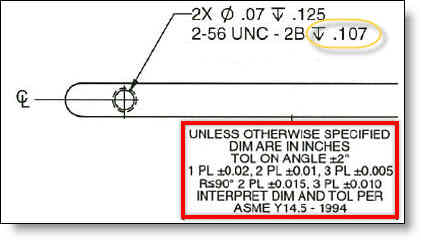
It is very common to see drawings where a tapped hole dimension is left with a three decimal place value (.xxx) which means the tolerance will be determined by the title block tolerance on the drawing. For many companies this means the thread depth will have a +-.005″ tolerance. Trying to hold a thread depth to a tolerance of .005″ is very hard to do and is quite expensive. There is a good example of this in figure B, which shows a threaded hole and its corresponding title block tolerance.

Figure B: Thread with a .005″ depth tolerance.
If your company does not intend a .005″ depth tolerance, one option is to develop an understanding with your shop that any blind thread depth may be considered a minimum only with no breakout allowed on the opposite side. If you have a tapped through hole then this would clearly not apply, and if you put an explicit depth tolerance if you ever did intend to hold a tolerance tighter, then the rule wouldn’t apply either. With that understanding in place, the engineer won’t be spending time changing the drawing for every hole and the shop won’t beat themselves up trying to hold a tight tolerance, which you will eventually pay for in the end. Other great options are to change the hole to be two decimal places, or specify a minimum depth specifically.
p.s. – Keen observers will also note two other problems with the example above.
1) The .07″ pre-drill hole shouldn’t be specified, as it dictates which type of tap (cutting vs. forming) must be used to make the parts (unintentional for sure).
2) There isn’t enough clearance between the .125 hole depth and the .107 tap depth for a normal tap to be used. Even with a bottoming tap as seen at the top of figure A, the minimum recommendation is 2x the thread pitch (1/56 x2 = .035″) for the hole depth vs. tap depth. This hole only has .018″ of clearance which will drive up costs.


