Last month’s newsletter was a case study showing changes that were made to a real customer part to save them money. This month we are going to look at a third case study, unfortunately one without a good ending.
We were asked to quote on this part below. It was part of a large package of parts for a new program that would need thousands of parts over a few years. It was the kind of project any machine shop would love to win. Our direct customer is managing the assembly for the end customer so their engineers do not have authority to approve drawing changes. Only their customer can approve changes to the drawing. So this makes the process more challenging because there isn’t a direct connection between our engineers and the ones that can make decisions about recommendations.
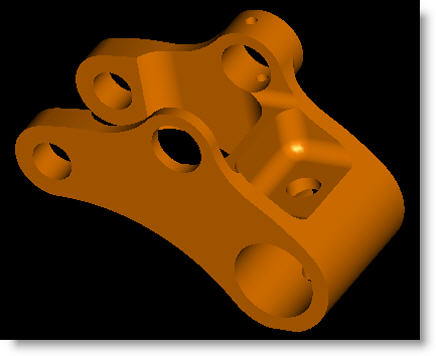
The first change that was proposed by both us and our customer was to go with custom extrusion. The outer 3 lobe shape of the part doesn’t actually touch anything in the assembly, so the tolerances are not critical. By going with a custom extrusion, a lot of material savings can be recognized and machining time is also reduced. In this case, nearly 50% of the material cost can be saved by going to an extrusion. The volumes justify the minimum lot size of 1000 lbs of extrusion and the die charge. This is a decision that always must be made when looking at custom extrusion.

Figure A: Part as designed. Many opportunities for savings.
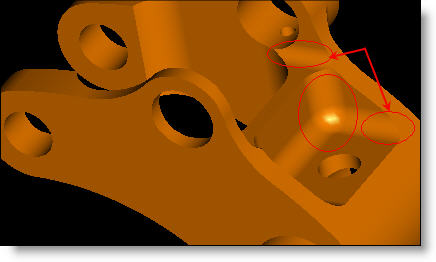
In figure B we can see the next design elements that were driving up cost. The vertical radius in the shelf was nearly identical to the floor radius which resulted in the condition where you have to surface the floor of the shelf with a ball end mill to remove the excess material. We discussed this specific condition back in our November 2008 newsletter. Another cost driver is the fact that the floor radius isn’t the same as the floor radius on the floor just up from that lower shelf. Both are circled in figure B. These non-equal radii require a different endmill to be used which is additional tool motion, tool change and more programming. They are so similar it seems hard to believe they couldn’t be equal.

Figure B: Floor vs. wall radii problems.
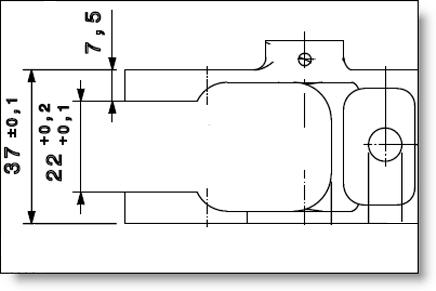
In figure C we see another opportunity for savings. This presents an opportunity both at the programming and set-up stage, and it also affects the machine time of the part which adds cost to the processing. If you study the slot size and tolerance you will realize that the model as-drawn will produce a part that is out of tolerance if you program to the model. The +/+ tolerance on the slot width is not represented in the solid model. In order for the slot to be in tolerance the programmer must program the slot at +.15 mm over the nominal width, or 22.15 mm. This requires actually putting a cut in the customers 3D model to represent what they actually are asking for. And because the width of the upper tab is dimensioned at 7.5 mm with a block tolerance of +/-.1 mm you cannot take all of the material out of the upper tab or else it will be out of spec. This condition isn’t actually as bad as another part of this assembly where the slot was +.2, +.3 which created a condition where the slot could not be symmetrical in the tabs and had to have the lower tab be thinner than the upper. It is clearly not the engineers design intent.
As it relates to machine time, this relatively high tolerance of .1mm total with a large open section requires a multi-step process to machine in spec. When the rough material is removed from the slot, the tabs collapse in on themselves requiring some very slow finishing cuts to achieve the tolerance without introducing chatter or taper. If we were to change our fixturing to squeeze the tabs to allow the machining to happen faster, you would need to rough cut them, release the clamps to let the material collapse, then re-clamp in order to do the finish cuts to size. This just isn’t practical to do with out extraordinarily expensive fixturing. The really silly part about this situation is that a bushing gets installed between the tabs, and the bushing will determine the width of the tabs once the bolt is tightened. It is totally unnecessary to hold the slot width so tight as it won’t affect the final function of the part anyway.

Figure C: Poorly toleranced slot adds considerable cost.
Lastly, there is an edge break tolerance for all edges of .1 mm to .3 mm. The cost pressures of this part preclude the option of doing in-machine edge breaking as it would take too much time. But vibratory tumbling may not produce an edge break to that tolerance. If you were to try to tumble the edge break on, the vibratory media might ruin the high tolerance bores because it would take a fair amount of time to get a fairly heavy edge break of .2 mm, or the middle of the range. It would be much less expensive to remove the tolerance of the edge break and just specify that edges must be broken and burrs are not permitted.
The unfortunate part about this story is that the end customer had already gone through testing with this part and was therefore unable or unwilling to make these changes, even though it is the only way to achieve the cost targets that they required. Had they asked for detailed feedback during the design phase, it would have been very simple to implement all of these suggestions and save them a lot of time and money.
Every month we feature a really cool part that we have made. January’s Part of the Month is not a Pro CNC project. I thought it would be fun to share a personal project I did with my 8 year old son who is a cub scout. We entered the “Outlaw” class for our recent Pinewood Derby race with our Drill Car. We took an old 1.25″ drill bit, cut the end off it, machined up some axles and polycarbonate wheels and put them on with RC car wheel bearings. At 22 oz. it is over 4x the 5 oz. weight limit of the normal wooden racers. We got a lot of laughs and had a lot of fun building it. But I have to admit that brand new RC car sealed ball bearings have more drag than just the nail and plastic wheel set-up of a normal car. We missed first place in the outlaw class by a about a tenth of a second. Maybe next year we’ll try some permanent magnet zero friction bearings…?
I imagine that a bunch of you engineers out there have made pretty cool Pinewood Derby cars. Send me a picture of your creations. I’ll send the coolest one a Pro CNC T-Shirt.


